Cheesy Garlic Butter Rollups
The first time I made these Cheesy Garlic Butter Rollups was on a chilly Sunday afternoon. I wanted something warm and comforting, so I rummaged through my kitchen and found some soft bread, cheese, and garlic. Who knew this little creation would become a go-to recipe for quick snacks and easy meals? Seriously, once you try them, you’ll be hooked!
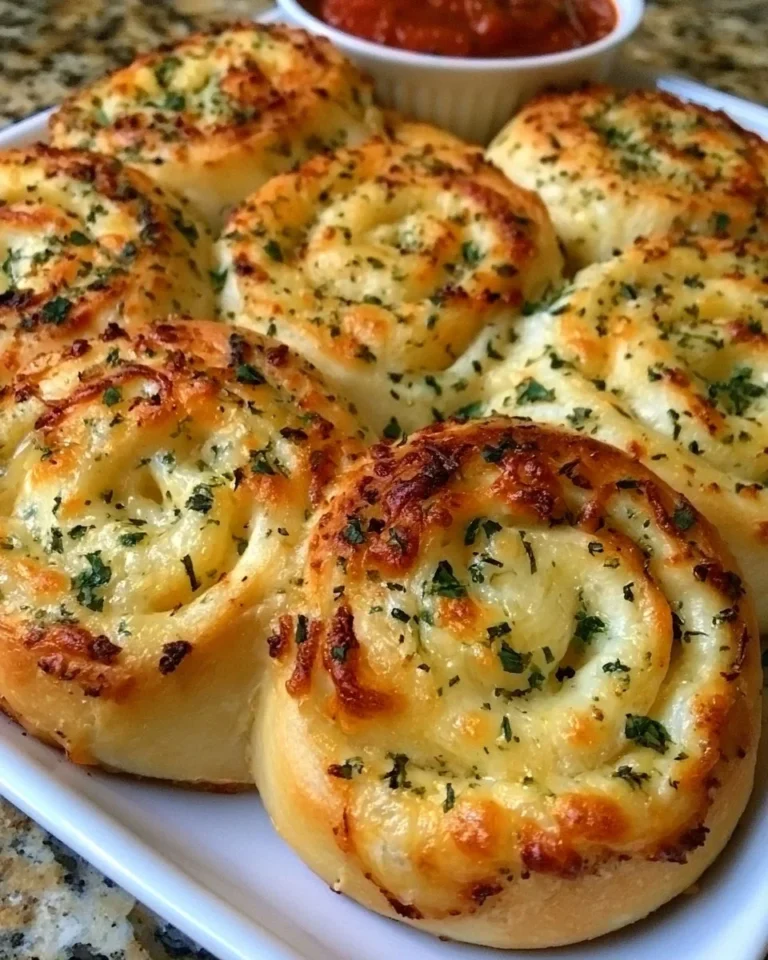
Imagine this: crispy golden rolls bursting with gooey melted cheese and a buttery garlic flavor that makes your taste buds dance. Whether it’s game night, a family gathering, or just a cozy evening at home, these rollups fit right in. Trust me, you’ll want to keep this recipe close by.
Why You’ll Love This Cheesy Garlic Butter Rollups Recipe
Let’s be real here. These Cheesy Garlic Butter Rollups are not just delish; they’re versatile too! Need a quick appetizer? Perfect. Looking for a fun addition to your movie night spread? These rollups got your back.
Here’s why you’re going to fall in love with this recipe:
- Simple Ingredients: You probably already have everything you need at home.
- Quick Preparation: Ready in about 20-30 minutes, they’re perfect for when you need something fast.
- Customizable: Use any cheese you like or even throw in some herbs or spices.
There’s something about combining garlic and butter that just does it for me, and when you add cheese into the mix, it’s pure magic.
Preparation Phase & Tools to Use
Before diving in, here’s what you’ll need:
- A rolling pin (or your hands will work just fine)
- A baking sheet
- Parchment paper (optional for easier cleanup)
- A sharp knife
Keep reading, this part matters…
Having the right tools makes everything smoother. For me, using a silicone baking mat on my baking sheet helps prevent sticking. You might want to give it a try!
Ingredients for Cheesy Garlic Butter Rollups
Here’s what you’ll need to create this delightful dish:
- Soft bread (like white bread or rolls)
- Cheese (mozzarella or cheddar work best)
- Butter (for that rich flavor)
- Garlic (minced, of course)
- Parsley (optional for garnish)
- Marinara sauce (for dipping)
Before you move on, a quick note: feel free to get creative with the type of cheese. Some recipes even use a blend!
How to Make Cheesy Garlic Butter Rollups at Home
Now that we’ve gathered everything, let’s get rolling! Here’s how you can whip up these tasty rollups:
- Preheat your oven to 375°F (190°C).
- Flatten the slices of soft bread with a rolling pin or your hands. The goal here is to make them easier to roll, so don’t rush this step!
- Spread melted butter mixed with minced garlic generously on each slice. This is where the magic starts.
- Place cheese on one end of each slice and roll them up tightly. It’s okay if some cheese peeks out; it just means extra deliciousness.
- Place the rollups seam side down on a baking sheet. Don’t forget to lightly grease it or use parchment paper.
- Brush the tops with more melted butter and sprinkle with parsley if using. It adds a nice touch.
- Bake for 15-20 minutes or until golden and the cheese is melted. You might need an extra minute depending on your oven, so keep an eye on them!
- Serve warm with marinara sauce for dipping.
Honestly, the smell while these are baking is to die for. It always reminds me of comforting times spent in my kitchen, chatting with family.
Pro Tips for Best Results
- Use Fresh Ingredients: Fresh garlic makes a noticeable difference in flavor.
- Don’t Overfill: It’s tempting to add a ton of cheese, but too much can make rolling tricky.
- Cool Slightly Before Serving: Let them sit for a minute before digging in to avoid burning your fingers.
There’s one mistake that can ruin this: over-baking. Watch them closely so they don’t go from perfectly golden to burnt!
Variations & Customization Ideas
Want to give these Cheesy Garlic Butter Rollups your twist? Here are some fun ideas:
- Herbed Rollups: Mix some Italian seasoning or fresh herbs into the butter.
- Spicy Twist: Add a sprinkle of crushed red pepper flakes for a kick.
- Meaty Rolls: Include slices of ham or pepperoni for more filling.
The sky’s the limit here, so get creative!
Common Mistakes to Avoid
- Not flattening the bread: This step is essential for easy rolling.
- Skipping the butter: It really adds a layer of flavor; don’t skip this part.
- Not checking the oven: Every oven is different, so know your own a bit better.
Most people miss this step, and it makes a huge difference in texture.
What to Serve With Cheesy Garlic Butter Rollups
These little gems are great on their own, but they pair wonderfully with:
- A fresh salad
- Soup (tomato or minestrone are perfect choices)
- Your favorite dipping sauce
Honestly, they complement a variety of dishes, bringing warmth and comfort to any table.
Storage & Reheating Instructions
If you somehow have leftovers (which is rare in my house), here’s how to store them:
- In the Fridge: Place in an airtight container and consume within 2-3 days.
- To Reheat: Pop them back in the oven at 350°F (175°C) for 5-10 minutes until warm.
They’ll still taste amazing, though the texture may vary.
Estimated Nutrition Information
- Serving Size: 2 rollups
- Calories: 250
- Fat: 15g
- Carbohydrates: 20g
- Protein: 8g
Note: This is estimated and can change based on your ingredients.
FAQs
1. Can I use different types of bread?
Absolutely! Any soft bread will work, so feel free to experiment.
2. What’s the best cheese to use?
Mozzarella is classic, but cheddar or a mix of both can also be delicious.
3. Can I make these ahead of time?
You can prepare them a few hours in advance, just cover them and refrigerate until you’re ready to bake.
4. Are these suitable for freezing?
Yes, you can freeze them before baking. Just make sure to cook them from frozen!
5. How long do they take to bake from frozen?
Add about 10 minutes to the baking time if they’re frozen.
Expert Tips for the Best Cheesy Garlic Butter Rollups
Before you dive into making these rollups, remember a couple of key things:
- Don’t rush the rolling process; it’s crucial for even baking.
- Experiment with flavors and fillings—don’t be afraid to try something new!
This Cheesy Garlic Butter Rollups recipe is perfect for quick meals, easy snacks, or special occasions. Your friends and family will be begging for the recipe!
Now, you know how to make these tasty treats. Try it and see how it turns out! Have fun in the kitchen, and save this recipe for later. For more delicious ideas, check out our easy dinner recipes or quick breakfast recipes!
PrintCheesy Garlic Butter Rollups

Crispy golden rolls bursting with gooey melted cheese and buttery garlic flavor, perfect for quick snacks and easy meals.
- Prep Time: 10 minutes
- Cook Time: 15 minutes
- Total Time: 25 minutes
- Yield: 4 servings
- Category: Appetizer
- Method: Baking
- Cuisine: American
- Diet: Vegetarian
Ingredients
- Soft bread (like white bread or rolls)
- Cheese (mozzarella or cheddar work best)
- Butter (for that rich flavor)
- Garlic (minced)
- Parsley (optional for garnish)
- Marinara sauce (for dipping)
Instructions
- Preheat your oven to 375°F (190°C).
- Flatten the slices of soft bread with a rolling pin or your hands.
- Spread melted butter mixed with minced garlic generously on each slice.
- Place cheese on one end of each slice and roll them up tightly.
- Place the rollups seam side down on a baking sheet.
- Brush the tops with more melted butter and sprinkle with parsley if using.
- Bake for 15-20 minutes or until golden and the cheese is melted.
- Serve warm with marinara sauce for dipping.
Notes
Let them cool slightly before serving to avoid burning your fingers. Use fresh ingredients for best flavor.
Nutrition
- Serving Size: 2 rollups
- Calories: 250
- Sugar: 2g
- Sodium: 300mg
- Fat: 15g
- Saturated Fat: 8g
- Unsaturated Fat: 5g
- Trans Fat: 0g
- Carbohydrates: 20g
- Fiber: 1g
- Protein: 8g
- Cholesterol: 30mg