
Introduction to Cherry Pistachio Cheesecake
I know how important it is to have a delightful dessert recipe up your sleeve. Let me introduce you to the *Cherry Pistachio Cheesecake*! This beautiful cheesecake not only looks impressive but also tastes deliciously creamy with a pop of tart cherry.
Whether you’re celebrating a special occasion or simply craving something sweet, this dessert is perfect. It combines the crunch of pistachios and the sweetness of cherries, making it a quick yet elegant solution for any day. Plus, it’s easy to prepare, so you can enjoy it with your loved ones without all the fuss.
Why You’ll Love This Cherry Pistachio Cheesecake
This *Cherry Pistachio Cheesecake* embraces simplicity without sacrificing flavor. With just a handful of ingredients and minimal prep time, you can whip it up during your busy week. The creamy texture melds beautifully with the cherry topping, creating a balance that will delight your taste buds. It’s not only a crowd-pleaser but also a comforting dessert that brings a little luxury to everyday moments, making it a win-win for every stressful day!
Ingredients for Cherry Pistachio Cheesecake
Gathering the right ingredients is like assembling your secret weapon in the kitchen! For this scrumptious *Cherry Pistachio Cheesecake*, you’ll need:
- Graham cracker crumbs: They create a buttery, crunchy base that complements the creamy filling.
- Ground pistachios: These add a subtle nutty flavor and a gorgeous green hue to the crust. You can find them in most grocery stores or online.
- Sugar: Sweetens your cheesecake; it’s the magic dust that makes it irresistible!
- Melted butter: This brings the crust together, adding richness and depth to the flavor.
- Cream cheese: The heart of your cheesecake! Softened cream cheese gives that dreamy, creamy texture we all love.
- Sour cream: It enhances creaminess while adding a bit of tartness. It’s a fantastic way to elevate your dessert!
- Pistachio pudding mix: This dry powder not only boosts the pistachio flavor but also gives structure to the filling.
- Vanilla extract: A splash of vanilla brings warmth and depth, enriching the overall taste experience.
- Cherry pie filling: This is your striking topping that adds sweetness and a pop of color! You can opt for homemade if you’re feeling adventurous.
- Optional chopped pistachios: For a lovely garnish; they provide that extra crunch and a touch of elegance.
The specific amounts for each ingredient are listed at the bottom of the article, ready for printing. Happy gathering!
How to Make Cherry Pistachio Cheesecake
Now that we have our ingredients ready, it’s time to dive into the fun part! Making this *Cherry Pistachio Cheesecake* is simpler than you’d think. Just follow these steps, and you’ll be impressing your family or friends in no time.
Step 1: Preheat the Oven
First things first, preheat your oven to 325°F (160°C). This sets the perfect stage for baking your cheesecake. Don’t skip this step—it’s essential for even cooking.
While the oven warms up, grease a 9-inch springform pan. You can also line the bottom with parchment paper for easier removal later on. A well-prepped pan helps avoid any sticky situations!
Step 2: Make the Crust
Next, let’s make our crust. In a mixing bowl, combine the graham cracker crumbs, ground pistachios, sugar, and melted butter. Mix them well until everything is evenly coated.
Now, press this mixture firmly into the bottom of your prepared pan. It’s crucial to bake the crust for about 8 minutes. This step firms it up, creating a solid base for the rich filling. Let it cool while you prepare the cheesecake batter.
Step 3: Prepare the Filling
In another bowl, beat the softened cream cheese and sugar together until smooth. You want it creamy and free of lumps. This will give your cheesecake that dreamy texture we all adore.
Add the eggs one at a time, mixing well after each addition. Then, add the sour cream, pistachio pudding mix, and vanilla extract. Blend until all ingredients come together beautifully. This mixture should look velvety!
Step 4: Bake the Cheesecake
Pour your filling over the cooled crust, smoothing the top with a spatula. It’s time to bake! Slide it into your preheated oven and let it bake for 45–50 minutes.
To check if it’s done, look for a slight jiggle in the center. Once it’s set, turn off the oven and allow the cheesecake to cool inside with the door cracked. This helps prevent unsightly cracks on top.
Step 5: Chill and Serve
After letting it cool, cover the cheesecake with plastic wrap and refrigerate for at least 4 hours. If you can wait overnight, that’s even better; the flavors just get richer!
Once you’re ready to serve, spread the cherry pie filling on top. If you like, sprinkle some chopped pistachios for that extra flair. This finishing touch adds not only beauty but also a delightful crunch!
Tips for Success
- Make sure your cream cheese is at room temperature for easier mixing.
- Press the crust firmly to avoid a crumbly texture after baking.
- Allow the cheesecake to cool gradually in the oven for a smooth top.
- Chill your cheesecake overnight for the best flavor and texture.
- Don’t rush the assembly—take your time for beautifully layered flavors!
Equipment Needed
- 9-inch springform pan: This is essential for easy removal. A round cake pan works too, but it’ll be trickier to serve.
- Mixing bowls: Basic glass or stainless-steel bowls will do the job; no fancy gadgets necessary!
- Electric mixer: A hand mixer is great, but a stand mixer can save you some elbow grease.
- Spatula: Perfect for smoothing the filling and scraping every last bit from the bowl!
- Baking sheet: For placing your springform pan in the oven; it avoids drips and mess!
Variations of Cherry Pistachio Cheesecake
- Chocolate Cherry Pistachio Cheesecake: Swirl in some melted chocolate into the filling for a rich and indulgent twist.
- Gluten-Free Option: Substitute graham cracker crumbs with gluten-free cookie crumbles to cater to gluten sensitivities without skimping on flavor.
- Fruit Variations: Experiment with different toppings, like fresh strawberries or blueberries, bringing a seasonal flair to each bite!
- Dairy-Free Version: Use dairy-free cream cheese and sour cream to create a cheesecake that everyone can enjoy.
- No-Bake Option: For a lighter version, set the filling in a pre-made crust and chill until firm for a no-bake delight!
Serving Suggestions for Cherry Pistachio Cheesecake
- Pair with a dollop of freshly whipped cream for an extra touch of indulgence.
- Serve with a cup of hot coffee or dessert wine to enhance the flavors.
- Garnish with fresh cherries for a pop of color and freshness.
- Present on a beautiful cake stand to impress your guests!
- For a fun twist, add a scoop of vanilla ice cream alongside each slice.
FAQs about Cherry Pistachio Cheesecake
As with any beloved dessert, questions tend to pop up! Here are some frequently asked questions about the *Cherry Pistachio Cheesecake*, along with helpful answers to guide you.
Can I make this cheesecake ahead of time?
Absolutely! This *Cherry Pistachio Cheesecake* actually tastes better when made in advance. Just be sure to chill it for at least four hours, or overnight if possible, to let the flavors meld and develop.
What can I use instead of sour cream?
If you’re not a fan of sour cream, you can substitute it with Greek yogurt. It provides a similar tanginess, while adding a lovely creaminess without sacrificing any flavor.
How do I store leftovers?
Store any leftovers in an airtight container in the refrigerator. It’ll stay fresh and delicious for about 3 to 5 days, ready to satisfy your sweet tooth when the cravings strike!
Can I freeze Cherry Pistachio Cheesecake?
Yes, you can freeze this cheesecake! Wrap it tightly in plastic wrap and then foil before freezing for up to three months. Thaw it overnight in the fridge when you’re ready to enjoy it again.
Can I use fresh cherries instead of pie filling?
Absolutely! Fresh cherries can be pitted and cooked down with a bit of sugar to create your own topping. It’s a delightful way to bring a homemade touch to your *Cherry Pistachio Cheesecake*!
Final Thoughts
There’s something truly special about making a *Cherry Pistachio Cheesecake*. It’s not just about the ingredients; it’s about creating cherished moments with family and friends. This cheesecake, with its creamy filling and vibrant cherry topping, serves as a delightful centerpiece for any table. It brings smiles, laughter, and nostalgia with each delicious slice.
Every bite is a reminder of the sweet moments life has to offer, making it worth every bit of effort. So, whether it’s a special occasion or just a well-deserved treat after a long day, I encourage you to embrace the joy of baking this delightful dessert!
PrintCherry Pistachio Cheesecake
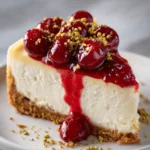
A creamy and rich cheesecake topped with sweet cherry pie filling and a crunchy pistachio crust.
- Prep Time: 30 minutes
- Cook Time: 50 minutes
- Total Time: 4 hours 30 minutes
- Yield: 8 servings 1x
- Category: Dessert
- Method: Baking
- Cuisine: American
- Diet: Vegetarian
Ingredients
- 1½ cups graham cracker crumbs
- ¼ cup ground pistachios
- 3 tbsp sugar
- 5 tbsp melted butter
- 16 oz cream cheese, softened
- ½ cup sugar
- 2 large eggs
- ½ cup sour cream
- ¼ cup pistachio pudding mix (dry powder)
- 1 tsp vanilla extract
- 1 can (21 oz) cherry pie filling
- Optional: extra chopped pistachios for garnish
Instructions
- Preheat oven: Set to 325°F (160°C). Grease a 9-inch springform pan or line the bottom with parchment paper.
- Make the crust: Combine graham crumbs, ground pistachios, sugar, and butter. Press into the bottom of the pan. Bake for 8 minutes, then let cool.
- Prepare the filling: Beat cream cheese and sugar until smooth. Add eggs one at a time, then sour cream, pudding mix, and vanilla. Mix just until smooth.
- Bake: Pour filling over the crust and smooth the top. Bake for 45–50 minutes, or until the center is just set. Turn off oven and let the cheesecake cool inside with the door cracked.
- Chill: Refrigerate cheesecake for at least 4 hours or overnight.
- Top and serve: Spread cherry pie filling over the chilled cheesecake. Garnish with chopped pistachios if desired.
Notes
- Ensure the cream cheese is softened for easier mixing.
- For a firmer cheesecake, bake a little longer.
- This cheesecake can be made a day ahead for better flavor.
Nutrition
- Serving Size: 1 slice
- Calories: 350
- Sugar: 25g
- Sodium: 320mg
- Fat: 22g
- Saturated Fat: 10g
- Unsaturated Fat: 8g
- Trans Fat: 0g
- Carbohydrates: 35g
- Fiber: 1g
- Protein: 6g
- Cholesterol: 80mg