Introduction to Chocolate Peanut Butter Snowballs
I know the sweet struggle of keeping everyone happy with delicious treats. That’s why I’m thrilled to share my recipe for Chocolate Peanut Butter Snowballs! These little delights combine the creamy richness of peanut butter with the decadence of chocolate, creating a flavor explosion that both kids and adults adore. They are not only fun to make but also a delight to eat! With no baking required, they fit perfectly into our hectic lives, allowing us to enjoy a slice of bliss without the fuss.
Why You’ll Love This Chocolate Peanut Butter Snowballs
You’ll fall in love with these Chocolate Peanut Butter Snowballs for so many reasons! First, they’re incredibly easy to whip up—perfect for those chaotic evenings when you just want a sweet treat without the hassle. Plus, they come together in just about an hour! Even better? The combination of creamy peanut butter and smooth chocolate is pure bliss, turning any day into a celebration. Trust me, you won’t be able to eat just one!
Ingredients for Chocolate Peanut Butter Snowballs
Creating Chocolate Peanut Butter Snowballs is a fun and rewarding experience, and having the right ingredients ready makes all the difference. Here’s what you’ll need:
- Creamy Peanut Butter: The star of the show! This smooth spread provides the rich flavor and texture we crave.
- Unsalted Butter: Adds a touch of creaminess. Since it’s unsalted, you can control the saltiness in your dessert.
- Powdered Sugar: Essential for sweetness and giving the snowballs their dreamy texture. Adjust the amount for your preferred consistency.
- Vanilla Extract: A splash of this aromatic essence enhances the overall flavor, making the treat truly delightful.
- Fine Salt (optional): Just a pinch can elevate the taste by balancing the sweetness.
- Crushed Graham Crackers (optional): Adds a fun crunch and extra flavor. Perfect for a s’mores twist!
- Crushed Vanilla Wafers (optional): These provide a sweet crunch while complementing the flavors of chocolate and peanut butter.
- Powdered Milk (optional): Incorporating this gives added creaminess and a bit of nostalgia, reminiscent of childhood treats.
- Semi-Sweet or Milk Chocolate Melting Wafers: The main coating for our snowballs. Choose dark chocolate for a richer taste or milk chocolate for a sweeter touch.
- Vegetable or Coconut Oil (optional): A small amount can help achieve a thinner chocolate coating for easier dipping.
- Soft Caramel Candies or Caramel Sauce: This sweet drizzle creates a tantalizing contrast with the chocolate, adding extra layers of flavor.
- Heavy Cream or Milk: Used to melt the caramel smoothly, this ensures it’s pourable for the perfect drizzle.
- Sea Salt Flakes (for decoration): A sprinkle adds a gourmet touch and enhances the sweetness.
- Crushed Peanuts (for decoration): Gives a nice crunch and adds to the peanut butter flavor.
- Sprinkles (for decoration): Because who can resist a little color and festivity on their treats?
- White Chocolate Drizzle (optional): Adds elegance and a delightful contrast to the dark chocolate coating.
For exact measurements and cooking instructions, check the bottom of the article. With these ingredients in hand, you’ll be on your way to creating a delightful batch of Chocolate Peanut Butter Snowballs!
How to Make Chocolate Peanut Butter Snowballs
Now comes the best part—making those decadent Chocolate Peanut Butter Snowballs! Follow these simple steps, and soon enough, you’ll be biting into a sweet, nutty treat that’s sure to delight.
Step 1: Mix the Peanut Butter Base
Start by grabbing a medium mixing bowl. Add in your creamy peanut butter, melted unsalted butter, vanilla extract, and a pinch of salt. With a sturdy spatula or a hand mixer, blend everything together until smooth and creamy. This base is where all the magic starts!
Step 2: Incorporate Powdered Sugar
Next, sift in the powdered sugar. Don’t rush this part! Gradually mix it in, beating until a thick, pliable dough forms. Depending on your preference, you can adjust the powder amount to achieve the perfect consistency. It shouldn’t be too sticky or too crumbly. Your sweet dough should be just right!
Step 3: Add Optional Ingredients
If you want to take your snowballs to the next level, now’s the time to add those optional ingredients. Toss in some finely crushed graham crackers, crushed vanilla wafers, or powdered milk. These additions give the snowballs a delightful crunch and add extra flavor. You know you’re onto something special when there’s a twist!
Step 4: Form the Snowballs
It’s time to have some fun! Use a teaspoon or a small scoop to portion out the dough. Roll each portion into smooth balls, roughly 1 inch in diameter. Place them on a parchment-lined baking sheet. Watching these little rounds come to life is incredibly satisfying!
Step 5: Chill the Dough
Before coating, it’s critical to chill the dough to ensure the snowballs hold their shape. Place the baking sheet in the refrigerator for at least 25 minutes, or pop it in the freezer for 10 to 15 minutes. This brief chill will firm up the centers, making them easier to coat later.
Step 6: Melt the Chocolate
Now, let’s talk about the chocolate. In a microwave-safe bowl, melt your chocolate in 20 to 30-second intervals, stirring in between each round. Continue until it’s fully smooth and melted. If you prefer a thinner consistency, blend in a little vegetable or coconut oil. It’s like creating a silky chocolate river for your snowballs!
Step 7: Coat the Snowballs
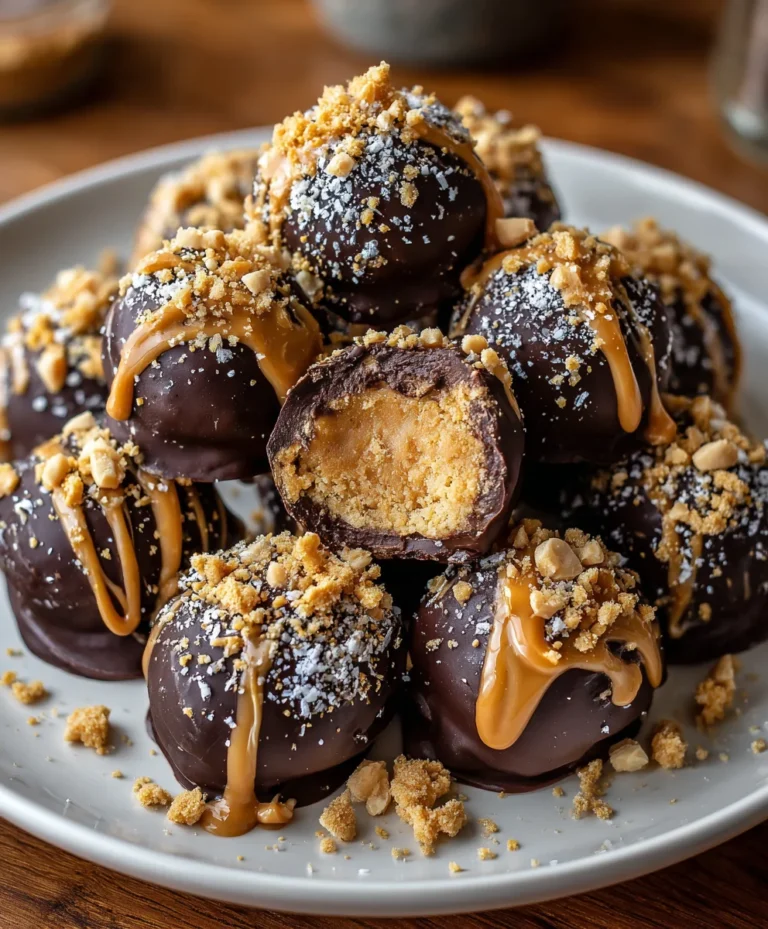
It’s dipping time! Retrieve your chilled snowballs from the refrigerator. Using a fork or a dipping tool, carefully submerge each ball in the melted chocolate, letting the excess drip off. Place each coated snowball back on the parchment-lined tray. The anticipation builds as they start looking like little masterpieces!
Step 8: Add Caramel Drizzle
To amp up the indulgence, melt your caramel candies with heavy cream or milk. Use the same microwave-safe bowl trick, heating in 10 to 15-second intervals and stirring until smooth and fluid. With a spoon or piping bag, drizzle that luscious caramel over the chocolate-coated snowballs. Trust me, this caramel layer makes all the difference!
Step 9: Add Toppings
Before the caramel sets, now’s the perfect moment to add your favorite toppings! Sprinkle some sea salt flakes for a gourmet touch, or toss on crushed peanuts or colorful sprinkles. This is where you get to be an artist, so let your creativity shine!
Step 10: Chill Again
Finally, return the tray to the refrigerator for another 15 to 20 minutes to allow the chocolate and caramel toppings to firm up. When they’re set, and you’re ready to indulge, simply transfer your delightful creations to an airtight container for storage—or straight to a plate to share with family! Either way, these Chocolate Peanut Butter Snowballs are a treat everyone will love!
Tips for Success
- Make sure to use creamy peanut butter for a smooth texture.
- Adjust the powdered sugar gradually; it’s easier to add than to remove.
- Chill the snowballs adequately before dipping to maintain shape.
- Experiment with different toppings to personalize your snowballs!
- Store any leftovers in an airtight container in the fridge for up to a week.
Equipment Needed
- Medium Mixing Bowl: Essential for creating your peanut butter mixture. A sturdy glass or metal bowl works well.
- Spatula or Hand Mixer: Use either for blending the ingredients. A spatula is great for mixing by hand.
- Parchment Paper: Line your baking sheet with this for easy cleanup. Wax paper can be a substitute.
- Microwave-Safe Bowl: Needed for melting chocolate and caramel. A glass bowl is perfect.
- Fork or Dipping Tool: Either is used for dipping your snowballs into chocolate.
Variations
- Nut Allergies: Substitute peanut butter with sunbutter or almond butter for a nut-free option.
- Dietary Modifications: Use sugar-free powdered sugar and dark chocolate for a low-sugar version.
- Flavors Galore: Add a dash of cinnamon or a splash of almond extract to the mixture for a unique twist.
- Vegan Delight: Swap traditional butter for coconut oil and use dairy-free chocolate for a vegan treat.
- Fruit Fusion: Mix in finely chopped dried fruits like cranberries or apricots to add a chewy texture.
Serving Suggestions
- Pair Chocolate Peanut Butter Snowballs with a glass of cold milk for a classic combination.
- Serve alongside fresh fruit, like strawberries or bananas, to balance the sweetness.
- For a festive touch, present these treats on a colorful platter with decorative serving tools.
- Sprinkle extra crushed peanuts on top as a finishing touch before serving.
FAQs about Chocolate Peanut Butter Snowballs
As I’ve shared this recipe for Chocolate Peanut Butter Snowballs, I’ve had some common questions pop up. Let’s address those so you can dive right into making these delightful treats!
Can I make these Chocolate Peanut Butter Snowballs ahead of time?
Absolutely! You can prepare the snowballs a few days in advance. Just store them in an airtight container in the refrigerator, and they’ll stay fresh and delicious!
What if I don’t have graham crackers or vanilla wafers?
No worries! You can skip them or substitute with crushed cookies or other cereals that you have on hand. The goal is to add a bit of texture and flavor.
Can I use chocolate chips instead of melting wafers?
Yes, you can use semi-sweet or milk chocolate chips! Just remember to add a touch of oil to achieve a smoother melting consistency for that perfect coating.
How do I store any leftovers?
Place your leftover snowballs in an airtight container, separating layers with parchment paper. They’ll keep well in the fridge for up to a week—but I doubt they’ll last that long!
Are these snowballs suitable for kids?
Definitely! With the creamy peanut butter and sweet chocolate, them Chocolate Peanut Butter Snowballs are a kid-favorite. Just be cautious about any nut allergies!
Final Thoughts
Making Chocolate Peanut Butter Snowballs isn’t just about whipping up a quick dessert; it’s about creating memories with our loved ones. The joy on my children’s faces as they dive into the creamy, chocolatey goodness is priceless. These treats bring us together, turning an ordinary day into a sweet celebration. Whether it’s a rainy afternoon or a weekend gathering, you can’t go wrong with this delightful recipe. So, roll up your sleeves and indulge in the magic of these delectable snowballs. Trust me, the smiles they’ll bring are worth every delicious bite!
PrintChocolate Peanut Butter Snowballs

A delicious treat combining peanut butter and chocolate, perfect for any sweet tooth!
- Prep Time: 20 minutes
- Cook Time: 10 minutes
- Total Time: 1 hour
- Yield: 24 snowballs 1x
- Category: Dessert
- Method: No bake
- Cuisine: American
- Diet: Vegetarian
Ingredients
- 1 cup creamy peanut butter
- 2 tablespoons unsalted butter, melted
- 1 1/2 to 2 cups powdered sugar, sifted
- 1/4 teaspoon vanilla extract
- Pinch fine salt (optional)
- 1/2 cup finely crushed graham crackers (optional)
- 1/2 cup crushed vanilla wafers (optional)
- 1/4 cup powdered milk (optional)
- 12 ounces semi-sweet or milk chocolate melting wafers or chips
- 1 teaspoon vegetable or coconut oil (optional)
- 1/4 cup soft caramel candies or caramel sauce
- 1 teaspoon heavy cream or milk
- Sea salt flakes (decoration)
- Crushed peanuts (decoration)
- Sprinkles (decoration)
- White chocolate drizzle (decoration)
Instructions
- In a medium mixing bowl, blend peanut butter, melted butter, vanilla extract, and a pinch of salt until smooth.
- Gradually incorporate sifted powdered sugar until a thick, pliable dough forms, adjusting powder as needed for a firm, non-sticky texture.
- If desired, mix in crushed graham crackers, vanilla wafers, or powdered milk for added structure and flavor.
- Line a baking sheet with parchment paper.
- Portion dough using a teaspoon or small scoop, then roll between palms to form smooth balls, approximately 1 inch in diameter. Arrange on prepared tray.
- Place tray in the refrigerator for a minimum of 25 minutes, or freeze for 10 to 15 minutes, to ensure centers are firm before coating.
- In a microwave-safe bowl, melt chocolate in 20 to 30 second intervals, stirring after each, until fully smooth. Blend in oil if a thinner consistency is preferred.
- Remove centers from refrigeration. Using a fork or dipping tool, submerge each ball in melted chocolate, allowing excess to drip off. Place coated balls back on parchment-lined tray.
- Melt caramels with heavy cream or milk in a microwave-safe bowl, heating in 10 to 15 second intervals and stirring until fluid and smooth.
- Pipe or spoon melted caramel in thin lines over chocolate-coated balls. If using, immediately add sea salt flakes, crushed peanuts, sprinkles, or white chocolate drizzle before coatings set.
- Return tray to the refrigerator for 15 to 20 minutes until chocolate and caramel are fully firm.
- Transfer finished snowballs to an airtight container for storage.
Notes
- Adjust the amount of powdered sugar depending on the desired dough consistency.
- Chilling the dough is essential for firming up the snowballs before coating.
- You can customize toppings based on preference.
Nutrition
- Serving Size: 1 snowball
- Calories: 150
- Sugar: 12g
- Sodium: 50mg
- Fat: 8g
- Saturated Fat: 3g
- Unsaturated Fat: 5g
- Trans Fat: 0g
- Carbohydrates: 16g
- Fiber: 1g
- Protein: 3g
- Cholesterol: 5mg