Introduction to Christmas Mints
This holiday season, I can’t help but get excited about making Christmas mints! These delightful treats not only add color to any holiday spread, but they’re also surprisingly simple to whip up. As a busy mom, I appreciate recipes that don’t take hours in the kitchen.
Christmas mints are perfect for times when you need a festive dessert that will impress your loved ones without stealing precious time. Plus, they make a wonderful gift or potluck contribution. Let’s dive into this easy and delightful recipe that’ll sweeten your holiday celebrations!
Why You’ll Love This Christmas Mints
These Christmas mints are not just a breeze to make, they’re also a delightful treat your whole family will adore! In just 20 minutes, you can create a dessert that bursts with colors and festive flavors. They’re perfect for busy days when you want something quick yet impressive. Plus, every mint offers a refreshing peppermint taste that perfectly captures the essence of the season. What’s not to love?
Ingredients for Christmas Mints
To make these festive Christmas mints, you’ll need a handful of straightforward ingredients. Each one plays a vital role in adding flavor and texture to these delightful treats. Here’s what you’ll need:
- Granulated sugar: This sweetener forms the base of your mints, offering sweetness and structure.
- Cream cheese: An essential for creaminess, it gives the mints a lovely soft texture that’s irresistible.
- Unsalted butter: Helps bind the ingredients together, giving a rich flavor without added salt. Make sure it’s at room temperature for easier mixing!
- Light corn syrup: Adds moisture while preventing the mints from becoming too dry, creating that perfect chewiness.
- Peppermint extract: The star of the show! This extract brings that classic holiday flavor, making each bite refreshingly minty.
- Powdered sugar: This sweetener helps achieve the ideal dough consistency, making it easy to roll and shape into mints. The amount may vary based on your desired texture.
- Food coloring: Both green and red liquid food coloring will brighten up your mints, making them visually festive. You can leave one portion plain for a classic look!
These ingredients are easy to find at your local grocery store or pantry. Remember, the exact measurements are available at the bottom of this article if you want to print them out for easy reference. Happy mint-making!

How to Make Christmas Mints
Making Christmas mints is a fun and straightforward process. I’ll guide you through each step so you can create these delightful treats without any fuss. Grab your mixing bowl, and let’s get started!
Step 1: Mix the Base
In a large bowl, beat together the granulated sugar, cream cheese, unsalted butter, light corn syrup, and peppermint extract.
Use a hand mixer for a smooth, creamy mixture.
Don’t be afraid to get your hands in there if needed; it’s all part of the fun!
The creamy base is the heart of your Christmas mints, setting the stage for sweet success.
Step 2: Add the Powdered Sugar
Now, gradually sprinkle in 4¼ cups of powdered sugar while mixing.
This is where your dough begins to take shape!
Mix until the dough holds together and becomes soft yet pliable.
If it feels sticky, simply add more powdered sugar a little at a time until you reach the desired consistency.
Be patient—the perfect texture is just around the corner!
Step 3: Color the Dough
Next, divide the dough into three equal portions.
Here comes the fun part!
Add green food coloring to one portion, red to another, and keep the last one plain (white).
Knead each piece separately until the color is evenly distributed.
You’ll soon see your dough transform into a festive rainbow of holiday colors!
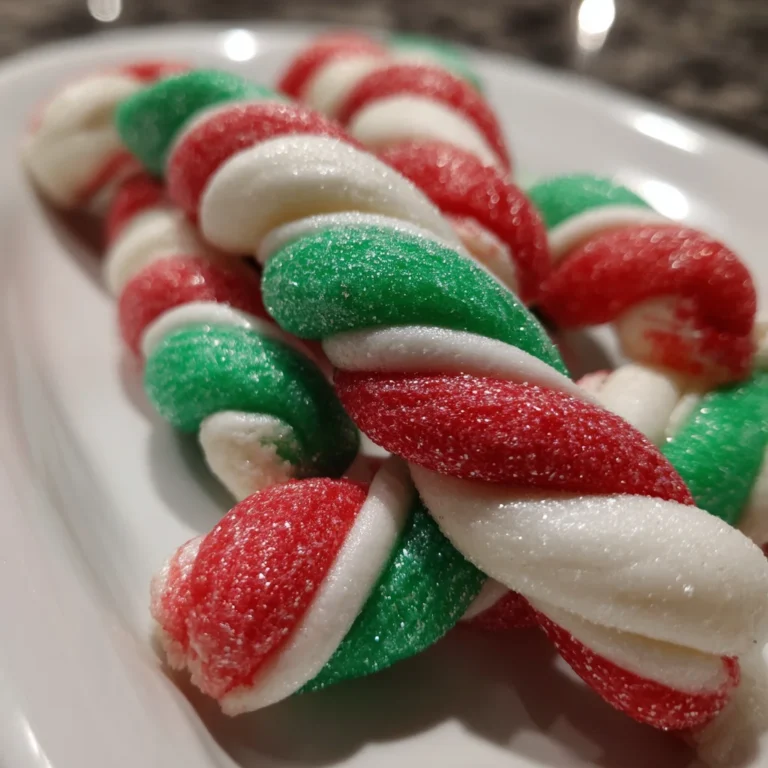
Step 4: Shape the Mints
Roll each colored dough into long, thin ropes about ½ inch thick.
It helps to lightly dust your surface with powdered sugar to prevent sticking.
Once you have your ropes, twist them all together gently.
Be sure to press them to seal the twist; this combination creates a delightful look.
Step 5: Cut and Dry
Finally, grab a sharp knife and slice the twisted rope into ½-inch pieces.
This is where your Christmas mints begin to shine!
Place the slices on a parchment-lined baking sheet.
Let them air dry for several hours or overnight.
Drying is essential for achieving that firm yet chewy texture that makes these treats so irresistible!
Tips for Success
- Make sure all ingredients are at room temperature for easier mixing.
- If the dough gets too sticky, don’t hesitate to add more powdered sugar gradually.
- Allow the mints to dry completely for the best texture; this step is key to achieving that delightful chewiness.
- Use a non-stick surface when rolling out the dough to prevent it from sticking.
- Experiment with flavors by adding a splash of vanilla extract for a twist!
Equipment Needed for Christmas Mints
- Mixing bowl: A large bowl is essential. If you don’t have one, a sturdy pot will work too!
- Hand mixer: Perfect for smooth mixing. You can also use a wooden spoon if you prefer a workout!
- Sharp knife: For cutting the mints. A pizza cutter can do the trick in a pinch!
- Parchment paper: Use it to line your baking sheet. Wax paper is an alternative, but parchment is best for sticking.
- Rolling pin (optional): For those who love to roll. You can also use your hands to shape the mints.
Variations of Christmas Mints
- Chocolate Christmas Mints: Mix in cocoa powder to create rich chocolate mints. The combination of chocolate and peppermint is absolutely divine!
- Nut-Free Alternative: If allergies are a concern, replace the unsalted butter with coconut oil for a similar texture and flavor.
- Vegan Version: Swap out cream cheese for a dairy-free alternative, like cashew cream, and use vegan butter or coconut oil.
- Flavor Twists: For another layer of flavor, try adding a few drops of almond or vanilla extract into the dough.
- Festive Shapes: Use cookie cutters to create fun shapes instead of slicing the ropes. Perfect for adding a personal touch to your holiday treats!
Serving Suggestions for Christmas Mints
- Serve these mints alongside a warm cup of hot cocoa for a cozy holiday treat.
- Place them in a decorative tin or jar for a thoughtful homemade gift.
- Arrange on a festive platter with other holiday cookies for a colorful dessert table.
- Add them to a gift basket with coffee or tea for a charming touch.
- Keep them in a shallow bowl as a sweet decoration on your dining table!
FAQs about Christmas Mints
I bet you’ve got some questions about these delightful Christmas mints! Let’s tackle a few that often pop up. I want to make sure you have all the info you need to create these festive treats with ease.
Can I make Christmas mints in advance?
Absolutely! You can make these mints a few days ahead of time. Just ensure you store them in an airtight container after they’ve dried completely. They’ll stay fresh and tasty for about a week, perfect for prepping for holiday gatherings!
What do I do if my dough is too dry?
If your dough feels crumbly and dry, don’t fret! Simply add a tiny bit of light corn syrup or a splash of water to help bring it together. Mix gently until it reaches that perfect pliable consistency.
How should I store my Christmas mints?
Once your mints have dried, place them in an airtight container at room temperature. Avoid refrigeration, as it can alter their texture and make them sticky.
Can I use other flavors besides peppermint?
Definitely! While peppermint is the traditional choice, feel free to experiment with flavors. Vanilla or almond extracts can add a lovely twist. Just remember to adjust the amount based on the strength of the flavor!
What’s the best way to serve these Christmas mints?
These mints shine on their own, but serving them alongside hot beverages is a great touch! Pairing them with cocoa, coffee, or tea elevates your holiday experience. They also make charming gifts, especially when placed in decorative tins!
Final Thoughts
Creating Christmas mints brings a joyful warmth to my holiday season, filling my kitchen with delightful scents of peppermint. These colorful treats aren’t just for indulging; they’re a canvas for creativity and family bonding. I love gathering around the table with my loved ones, rolling and twisting the dough together, sharing laughter and stories along the way.
Whether enjoyed at home or given as heartfelt gifts, these mints capture the spirit of togetherness. So gather your ingredients, roll up your sleeves, and let the magic of Christmas mints bring a little extra cheer to your holidays!
PrintChristmas Mints
Delightful and colorful Christmas mints perfect for the holiday season.
- Prep Time: 20 minutes
- Cook Time: 0 minutes
- Total Time: 20 minutes + drying time
- Yield: About 40 mints 1x
- Category: Dessert
- Method: No-bake
- Cuisine: American
- Diet: Vegetarian
Ingredients
- ⅓ cup granulated sugar
- 4 ounces cream cheese, room temperature
- 2 tablespoons unsalted butter, room temperature
- 2 tablespoons light corn syrup
- 1 teaspoon peppermint extract
- 4¼ to 5 cups powdered sugar, divided
- 6 drops green liquid food coloring
- 6 drops red liquid food coloring
Instructions
- In a large bowl, beat the granulated sugar, cream cheese, butter, light corn syrup, and peppermint extract together until smooth and creamy.
- Gradually add 4¼ cups of powdered sugar and mix until the dough comes together and is pliable. Add more powdered sugar if too sticky.
- Divide the dough into three equal portions. Add green food coloring to one portion, red to the second, and leave the third plain (white). Knead each portion to evenly distribute the color.
- Roll each colored dough into long, thin ropes about ½ inch thick.
- Twist all three ropes together and gently press to seal.
- Use a sharp knife to cut the twisted rope into ½-inch slices.
- Place the slices on a parchment-lined baking sheet and let them air dry for several hours or overnight to firm up before serving.
Notes
- Ensure ingredients are at room temperature for better mixing.
- Adjust the amount of powdered sugar based on desired consistency.
- Let the mints dry completely for the best texture.
Nutrition
- Serving Size: 1 mint
- Calories: 60 kcal
- Sugar: 8 g
- Sodium: 0 mg
- Fat: 2 g
- Saturated Fat: 1 g
- Unsaturated Fat: 1 g
- Trans Fat: 0 g
- Carbohydrates: 10 g
- Fiber: 0 g
- Protein: 0 g
- Cholesterol: 5 mg