There’s just something magical about an Easter Chocolate Bunny Cake. I remember the first time I made this whimsical treat for my family. It was Easter Sunday, the sun was shining, and I felt the anticipation of kids hunting for eggs. I wanted to bring something festive to the table—and trust me, this cake did not disappoint!
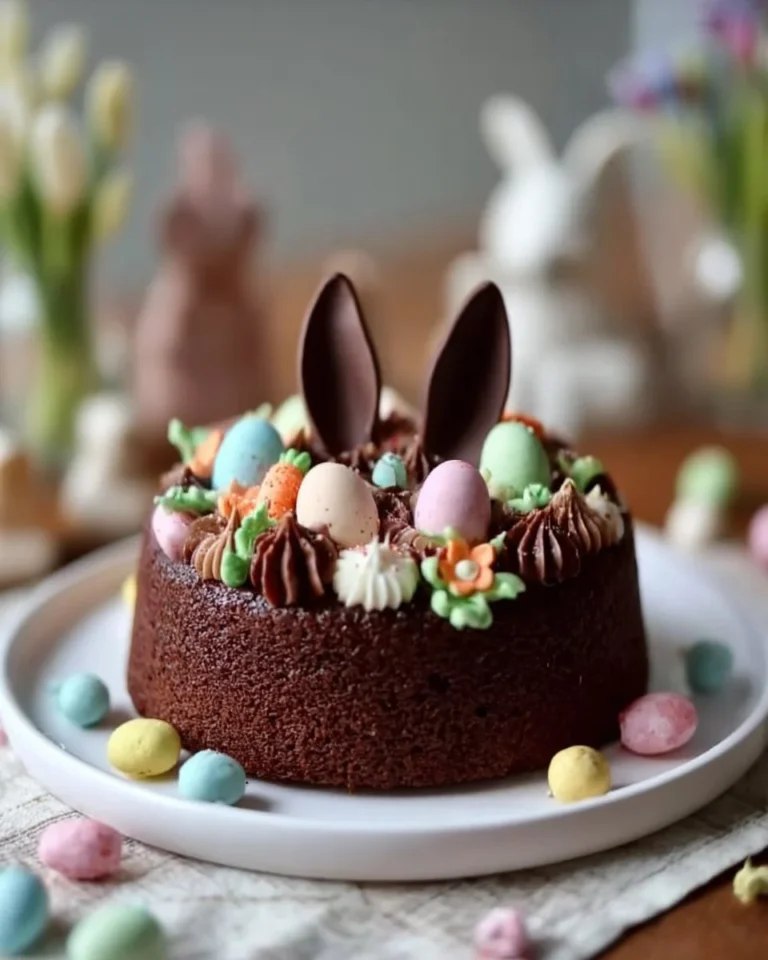
Picture this: two layers of rich chocolate cake, frosted with creamy chocolate frosting, adorned with pastel colors and candy eggs. Honestly, it’s the perfect centerpiece for your Easter celebration and is ridiculously easy to make. You know, that feeling when you care more about how it looks than how it tastes? Spoiler alert: this cake does both!
Why You’ll Love This Easter Chocolate Bunny Cake
This Easter Chocolate Bunny Cake isn’t just a feast for the eyes. It’s also a delicious treat that pleases every palate. Baking this cake will have your house smelling utterly heavenly. The rich chocolate flavor pairs beautifully with the sweet, creamy frosting and adds a festive touch with those candy eggs on top.
- It’s fun to decorate!
- Easy to make, even for beginners.
- Perfect for kids and adults alike.
And let’s be real, who doesn’t love a cake that looks like a chocolate bunny? It’s cheerful and sets the mood for the occasion. Every time I serve it, someone asks for the recipe. So yeah, get ready to bask in some compliments!
Preparation Phase & Tools to Use
Before diving into the recipe, let’s talk about what you need. You’ll want to gather:
- Baking pans: I recommend two 9-inch round cake pans.
- Mixing bowls: You’ll need at least two to keep things organized.
- Whisk and spatula: For mixing and folding.
- Cooling racks: Essential for letting your cakes cool evenly after baking.
Honestly, if you have a hand mixer, use it! It really speeds things up, especially when combining wet and dry ingredients. But if you don’t have one, a good ol’ whisk works just fine!
Ingredients for Easter Chocolate Bunny Cake
Here’s your shopping list for this delightful cake:
- 1 3/4 cups all-purpose flour
- 3/4 cup unsweetened cocoa powder
- 2 teaspoons baking powder
- 1 1/2 teaspoons baking soda
- 1/2 teaspoon salt
- 1 cup granulated sugar
- 1 cup milk
- 1/2 cup vegetable oil
- 2 large eggs
- 2 teaspoons vanilla extract
- 1 cup boiling water
- Chocolate frosting (store-bought or homemade)
- Pastel buttercream (for decoration)
- Candy eggs (the more colorful, the better!)
- Spring floral decorations (optional, but highly recommended)
How to Make Easter Chocolate Bunny Cake at Home
So, let’s get to the fun part—the baking!
-
Preheat your oven: Set it to 350°F (175°C). Make sure your baking pans are greased and floured. This is a crucial step; I once forgot and my cake stuck like it was glued down!
-
Mix the dry ingredients: In a large bowl, combine flour, cocoa powder, baking powder, baking soda, and salt. Set this aside.
-
Mix the wet ingredients: In another bowl, mix the sugar, milk, vegetable oil, eggs, and vanilla. Everything should look well-blended and deliciously smooth.
-
Combine both mixtures: Gradually add the dry ingredients to the wet ones. Mix until just combined. Here’s the thing: don’t overmix—you want that moisture to stay in the cake!
-
Stir in the boiling water: This step sounds odd, but it really makes a moist cake. Be careful; it’ll be thin, but that’s exactly what you want.
-
Divide and bake: Pour the batter evenly into your prepared pans. Bake for 30-35 minutes. Keep an eye on it; you might need an extra minute depending on your oven.
-
Cool down: Let the cakes cool in the pans for about 10 minutes before transferring them to a wire rack. They need to cool completely before frosting—trust me, you don’t want melted frosting!
-
Frost and decorate: Once cooled, layer the cakes with chocolate frosting. Then, let your creativity flow with the pastel buttercream, candy eggs, and decorations that scream Easter!
Pro Tips for Best Results
- Use room temperature ingredients: It truly makes a difference.
- Don’t rush the cooling step: It helps achieve the right texture.
- Add a pinch of love: Seriously, every cake tastes better when made with joy!
Variations & Customization Ideas
Feel free to make this your own! You can:
- Swap out the chocolate cake for vanilla if that’s more your family’s style.
- Add in colorful fruit like raspberries for a pop of flavor.
- Experiment with different frostings, like cream cheese or whipped cream.
Common Mistakes to Avoid
Most people miss the important step of properly greasing the pans, leading to cakes that refuse to budge! Also, don’t skip the cooling step; frosting a warm cake equals a gloppy mess.
What to Serve With Easter Chocolate Bunny Cake
To round out your Easter spread, consider serving:
- Fresh fruit salad
- Whipped cream or vanilla ice cream
- A light spring salad
Storage & Reheating Instructions
If you have leftovers (which I doubt!), store your cake in an airtight container or cover it well with plastic wrap. It’ll stay fresh for up to 3 days. You can also freeze slices; just thaw them in the fridge overnight before serving.
Estimated Nutrition Information
- Calories: ~350 per slice
- Fat: 15g
- Carbohydrates: 50g
- Protein: 4g
FAQs
1. Can I make this cake ahead of time?
Absolutely! You can bake the layers a day in advance, store them in airtight containers, and frost them the day you plan to serve.
2. What if I don’t have buttermilk?
Mix 1 tablespoon of lemon juice or vinegar with a cup of milk and let it sit for 5 minutes. Voila, instant buttermilk!
3. Can I use gluten-free flour?
Yes, there are many great gluten-free all-purpose flours available. Just make sure to check the baking instructions.
4. How do I make the frosting from scratch?
Combine 1 cup of softened butter with 3-4 cups of powdered sugar, a bit of cocoa powder, milk, and vanilla to taste.
5. What if I want a different decoration?
Go wild! Use seasonal fruits, chocolate shavings, or even edible flowers for a beautiful touch.
Expert Tips for the Best Easter Chocolate Bunny Cake
Don’t get discouraged if your first attempt isn’t Pinterest-perfect! Each bake brings you closer to mastering the art of cake.
One thing I noticed is that the cake always tastes better the next day when the flavors have had time to mingle.
Conclusion
So there you have it, the delightful Easter Chocolate Bunny Cake! This recipe is perfect for quick meals, easy snacks, or special occasions. I promise, once you make this cake, your family will be begging for it every year. Save this recipe for later, and give it a try—happy baking!
And don’t forget to check out some of my other recipes, like easy dinner recipes or quick breakfast recipes. Enjoy your Easter holiday with this sweet, chocolaty treat!
PrintEaster Chocolate Bunny Cake

A whimsical cake made with rich chocolate layers, creamy frosting, and festive candy decorations, perfect for Easter celebrations.
- Prep Time: 15 minutes
- Cook Time: 35 minutes
- Total Time: 50 minutes
- Yield: 12 servings 1x
- Category: Dessert
- Method: Baking
- Cuisine: American
- Diet: Vegetarian
Ingredients
- 1 3/4 cups all-purpose flour
- 3/4 cup unsweetened cocoa powder
- 2 teaspoons baking powder
- 1 1/2 teaspoons baking soda
- 1/2 teaspoon salt
- 1 cup granulated sugar
- 1 cup milk
- 1/2 cup vegetable oil
- 2 large eggs
- 2 teaspoons vanilla extract
- 1 cup boiling water
- Chocolate frosting (store-bought or homemade)
- Pastel buttercream (for decoration)
- Candy eggs (the more colorful, the better!)
- Spring floral decorations (optional, but highly recommended)
Instructions
- Preheat your oven to 350°F (175°C) and prepare your baking pans.
- Mix the dry ingredients in a bowl: flour, cocoa powder, baking powder, baking soda, and salt.
- Combine the wet ingredients: sugar, milk, vegetable oil, eggs, and vanilla in another bowl until smooth.
- Add the dry ingredients to the wet mixture. Mix until just combined.
- Stir in the boiling water carefully to achieve a moist cake batter.
- Divide the batter evenly into prepared pans and bake for 30-35 minutes.
- Cool the cakes in the pans for 10 minutes, then transfer to a wire rack.
- Frost and decorate the completely cooled cakes with chocolate frosting and creative toppings.
Notes
Use room temperature ingredients for best results and avoid rushing the cooling step for perfect texture.
Nutrition
- Serving Size: 1 slice
- Calories: 350
- Sugar: 20g
- Sodium: 300mg
- Fat: 15g
- Saturated Fat: 5g
- Unsaturated Fat: 8g
- Trans Fat: 0g
- Carbohydrates: 50g
- Fiber: 3g
- Protein: 4g
- Cholesterol: 30mg