Introduction to Mouthwatering No Bake Easter Dirt Cake Casserole
As the Easter season rolls around, I find myself reminiscing about my childhood. The excitement of bunny decorations and the sweet smell of chocolate filled the air. Today, I’m thrilled to share my Mouthwatering No Bake Easter Dirt Cake Casserole. It’s a delightful treat perfect for busy moms like us who crave simplicity without sacrificing taste. No baking? Yes, please! This dessert is an effortless way to impress loved ones at your Easter gathering. Trust me, with just a few layers of creamy goodness and crunchy cookie crunch, it’ll disappear faster than you can say “bunny hop!”
Why You’ll Love This Mouthwatering No Bake Easter Dirt Cake Casserole
This recipe is a game-changer for any home cook. First, it’s incredibly easy to whip up, saving you precious time during busy holiday preparations. The layers of creamy chocolate and crunchy cookies create a delightful texture that makes every bite a little adventure. Plus, it’s a hit with kids and adults alike, ensuring smiles all around! What’s not to love in this *Mouthwatering No Bake Easter Dirt Cake Casserole*?
Ingredients for Mouthwatering No Bake Easter Dirt Cake Casserole
Gathering your ingredients for the Mouthwatering No Bake Easter Dirt Cake Casserole is half the fun! Here’s what you’ll need to create this delightful dessert:
- Chocolate Sandwich Cookies: I recommend using Oreo brand for that classic taste. These cookies serve as the scrumptious base of our dish!
- Butter: I love using Kerrygold unsalted butter for its rich flavor. It blends beautifully into the creamy filling.
- Cream Cheese: Softened and at room temperature, this gives the casserole a wonderful creaminess that pairs perfectly with chocolate.
- Powdered Sugar: Sifted to avoid clumps, it sweetens the cream cheese mixture without making it gritty.
- Milk: You’ll need it to mix with the pudding. Use whole milk for extra creaminess, though any milk will do.
- Chocolate Pudding Mix: Instant Jell-O pudding is a must for that rich chocolate flavor. It thickens beautifully when combined with milk.
- Whipped Topping: This adds a light and fluffy texture. Feel free to use homemade whipped cream if you prefer.
- Vanilla Extract: A splash of pure vanilla enhances the overall flavor and adds warmth to the pudding layer.
- Candy-Coated Chocolate Pieces: These colorful gems add a fun crunch and festive touch to your masterpiece.
- Marshmallow Chicks: Adorable and fluffy, they’re perfect for decorating the top. You can find them in stores during Easter.
For detailed measurements, check the bottom of this article where all the ingredients are listed for easy printing. Now, let’s get ready to layer our sweet creation!
How to Make Mouthwatering No Bake Easter Dirt Cake Casserole
Step 1: Prepare the Cream Cheese Mixture
Start by gathering your ingredients. In a medium bowl, combine the softened cream cheese and butter. Using an electric mixer, beat them together on medium speed for about 2–3 minutes. I love watching it transform into a light and fluffy mixture! Once combined, gradually add in the sifted powdered sugar. This will sweeten your mix perfectly. Remember, don’t rush this step; blending it thoroughly will make your filling irresistible. It’s like creating magic in a bowl! Once it’s fluffy and smooth, you’re ready for the next step.
Step 2: Create the Chocolate Pudding Layer
Now, let’s move on to the chocolate pudding layer! In a separate bowl, whisk together the milk and Jell-O chocolate pudding mix. Do this until it becomes nice and smooth—this usually takes around 1–2 minutes. This pudding mix is the heart of your Mouthwatering No Bake Easter Dirt Cake Casserole! When it’s ready, gently pour this chocolate pudding into your cream cheese mixture. Use a spatula to fold it into the mixture gently. I like to visualize it as a sweet chocolate cloud enveloping our creamy filling. After everything is combined, it’s time to add the whipped topping for a light, airy texture.
Step 3: Layer the Crushed Cookies
Next up, the most satisfying part: crushing the cookies! Grab your chocolate sandwich cookies and place them in a zip-lock bag. Use a rolling pin or your hands to smash them into fine crumbs, leaving some chunky pieces for texture. You want a mix of dust and little chunks for that fun crunch! Spread half of this crushed cookie mixture evenly on the bottom of your 9×13-inch baking dish. This layer serves as the sturdy base for our dirt cake. As you layer, think of it as creating a cozy bed for the rich chocolate creaminess to come!
Step 4: Assemble the Casserole
Ready to bring it all together? Pour your pudding-cream cheese mixture over the layer of crushed cookies. Use a spatula to spread it evenly, filling every nook. This is where the magic happens! Then, take the remaining crushed cookie mixture and sprinkle it on top of the pudding layer. Don’t forget to press it down gently; this helps it meld together. It’s like building a deliciously rich chocolatey dirt mound that kids will love to dig into. Once layered, cover the casserole with plastic wrap and prepare it for chilling!
Step 5: Chill Before Serving
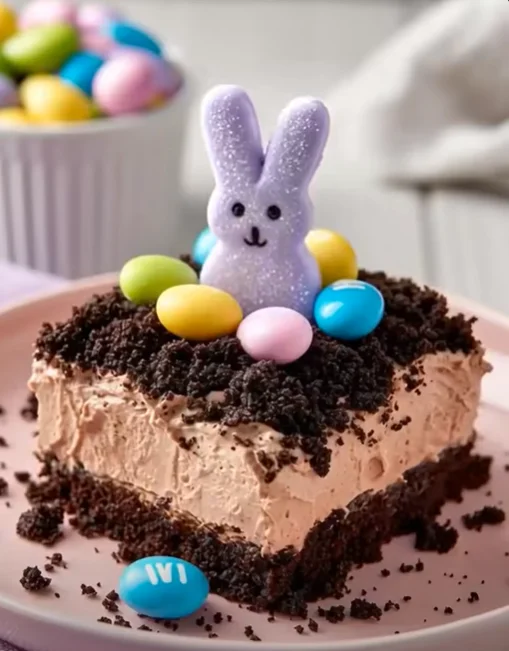
Chilling is crucial for the Mouthwatering No Bake Easter Dirt Cake Casserole to set properly. Pop it in the fridge for at least 2 hours, but 6 hours is even better if you can wait that long! Allowing the magic to happen overnight creates intense flavors and a wonderful texture. Before you serve, scatter some candy-coated chocolate pieces and place marshmallow chicks on top. Optional: add edible grass around the edges for a festive touch! When you’re ready to serve, scoop down to get all those layers. Your friends and family will be in awe!
Tips for Success
- Make sure your cream cheese is at room temperature for easy blending.
- Use a light touch when folding in the whipped topping to keep it airy.
- For a crunchy texture, crush your cookies just before assembling the casserole.
- Chill the dessert overnight for the best flavor and texture.
- Feel free to customize the toppings to match your Easter theme!
Equipment Needed
- Medium mixing bowl: A standard bowl works, but a glass bowl lets you see the creamy goodness.
- Electric mixer: If you don’t have one, a whisk works—just prepare for a little workout!
- 9×13-inch baking dish: Any similar-sized dish will do, perfect for sharing.
- Spatula: A sturdy silicone spatula helps with folding and spreading.
- Zip-lock bag: Great for crushing cookies; a clean kitchen towel works, too!
Variations
- Healthier Option: Substitute low-fat cream cheese and light whipped topping to reduce calories while retaining flavor.
- Gluten-Free: Use gluten-free chocolate sandwich cookies to make this dessert suitable for gluten-sensitive guests.
- Fruit Enhancement: Add layers of fresh strawberries or raspberries for a fruity twist and a pop of color.
- Nutty Delight: Incorporate chopped nuts such as walnuts or pecans for added crunch and richness.
- Flavor Infusion: Try adding a dash of mint extract for a refreshing mint chocolate variation or coffee-flavored pudding for a mocha touch.
Serving Suggestions
- Pair with fresh fruit like strawberries or blueberries for a refreshing balance.
- Serve alongside whipped cream or vanilla ice cream for an extra treat.
- For drinks, consider iced tea or sparkling lemonade to keep it light.
- Present it on a vibrant Easter-themed platter for a festive touch.
- Consider adding colorful dessert plates to enhance the celebration vibe!
FAQs about Mouthwatering No Bake Easter Dirt Cake Casserole
Can I make this Mouthwatering No Bake Easter Dirt Cake Casserole in advance?
Absolutely! This dessert is perfect for make-ahead preparation. You can prepare it a day in advance and let it chill overnight. Just remember to add the toppings right before serving for that fresh look!
How long will this Easter Dirt Cake Casserole last in the fridge?
Once assembled, it will last about 3-5 days in the refrigerator. Just make sure to keep it covered to maintain freshness!
Can I customize the toppings for this dessert?
Yes! Feel free to get creative with toppings. You can use a variety of candies, like gummy worms, or fresh fruit for a fun twist. It’s also a great way to align the dessert with your Easter theme!
Is it possible to use a different flavor of pudding?
For sure! While chocolate is traditional, vanilla or butterscotch pudding can be delightful alternatives as well. Just keep in mind, flavors might change the overall taste but will still yield a delicious result!
Is this dessert suitable for a vegetarian diet?
Yes! The Mouthwatering No Bake Easter Dirt Cake Casserole is completely vegetarian-friendly. It’s a great option for gatherings where dietary needs vary.
Final Thoughts
Making the Mouthwatering No Bake Easter Dirt Cake Casserole brings joy to both my kitchen and my gatherings. It’s not just about the layers of chocolatey goodness; it’s about the laughter and connection created around the table. This no-bake treat is perfect for families, easy to prepare, and simply delightful to share. As the colorful marshmallow chicks and candy-coated chocolate pieces come together, they serve as a reminder that little moments can be truly special. I hope this recipe adds a dash of sweetness to your Easter celebrations and becomes a cherished favorite in your home!
PrintMouthwatering No Bake Easter Dirt Cake Casserole

A delightful and festive no-bake dessert perfect for Easter celebrations, featuring a creamy chocolate filling layered with crunchy cookie crust.
- Prep Time: 30 minutes
- Cook Time: 0 minutes
- Total Time: 2 hours 30 minutes
- Yield: 12 servings 1x
- Category: Dessert
- Method: No Bake
- Cuisine: American
- Diet: Vegetarian
Ingredients
- 15.5 oz chocolate sandwich cookies (Oreo brand recommended)
- 3/4 cup butter (Kerrygold unsalted preferred)
- 8 oz cream cheese (room temperature)
- 1.25 cups powdered sugar (sifted)
- 3 cups milk
- 6.8 oz chocolate pudding mix (Jell-O brand instant)
- 16 oz whipped topping
- 1 teaspoon vanilla extract
- 1 cup candy-coated chocolate pieces
- 20 marshmallow chicks
Instructions
- In a medium bowl, combine softened cream cheese, butter, and sifted powdered sugar. Beat with an electric mixer on medium speed until light and fluffy (2-3 minutes).
- In a separate bowl, whisk together milk and instant chocolate pudding mix until smooth (about 1-2 minutes). Pour this pudding into the cream cheese mixture and fold gently until combined.
- Add vanilla extract to the pudding mixture and gently fold in the whipped topping in two additions.
- Crush the chocolate sandwich cookies into fine crumbs and larger chunks. Spread half of the crushed cookies in an even layer at the bottom of a 9×13 inch baking dish.
- Pour the pudding-whipped topping mixture over the cookies and spread evenly. Top with the remaining crushed cookies, pressing them gently into the pudding layer.
- Cover the casserole with plastic wrap and refrigerate for at least 2 hours (up to 6 hours is ideal).
- Before serving, scatter candy-coated chocolate pieces and arrange marshmallow chicks over the top of the chilled casserole. Optionally add edible grass around the edges.
- Serve directly from the dish, scooping down to get all the layers.
Notes
- This dish can be made ahead of time, making it great for parties.
- For a festive look, consider adding edible grass around the edges.
- Maintain the airy texture by folding in the whipped topping gradually.
Nutrition
- Serving Size: 1 piece
- Calories: 320
- Sugar: 25g
- Sodium: 210mg
- Fat: 18g
- Saturated Fat: 10g
- Unsaturated Fat: 4g
- Trans Fat: 0g
- Carbohydrates: 38g
- Fiber: 1g
- Protein: 3g
- Cholesterol: 30mg