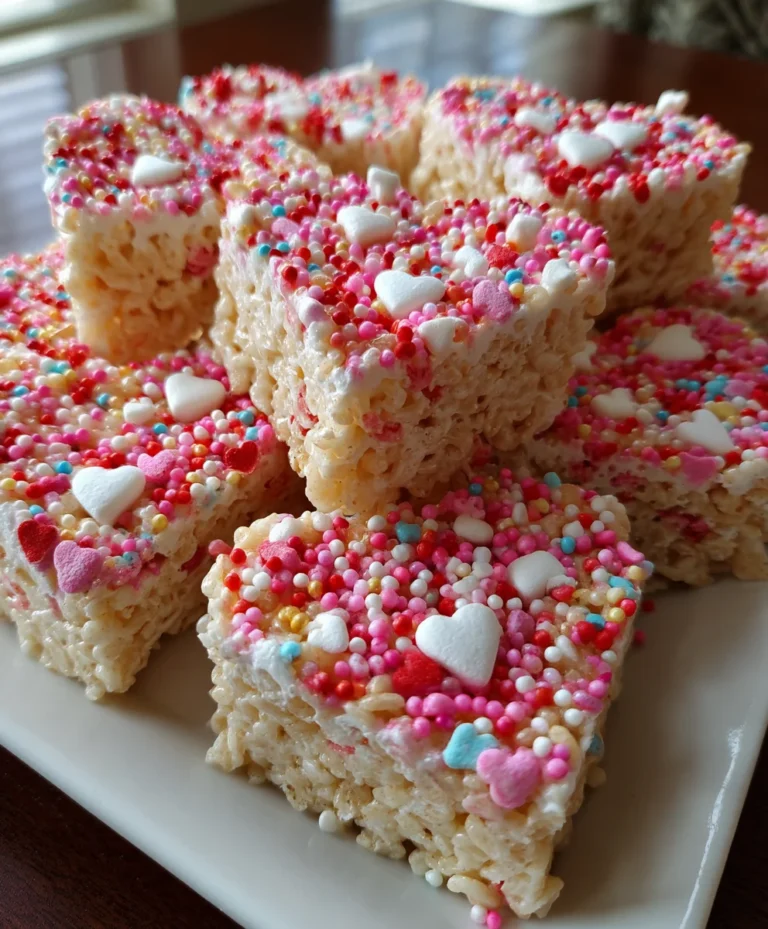
Introduction to Rice Krispie Valentine Hearts
Valentine’s Day is just around the corner, and what better way to express your love than with adorable Rice Krispie Valentine Hearts? These delightful treats are not only simple to whip up, but they also bring a sprinkle of joy to your special day. I know how hectic life can be, especially for busy moms and professionals. That’s why I adore this recipe – it’s a quick solution that your loved ones will cherish. Picture their smiling faces as they indulge in these sweet, crispy hearts, sharing laughter and love with every bite.
Why You’ll Love This Rice Krispie Valentine Hearts
These Rice Krispie Valentine Hearts are a lifesaver when you’re short on time but still want to create something special. They come together in just 15 minutes, making them the perfect sweet treat for any busy day. Plus, their irresistible crispy texture and gooey marshmallow goodness will delight everyone who tries them. You’ll love how easy they are to make and how they bring a little extra love to your Valentine’s Day celebration!
Ingredients for Rice Krispie Valentine Hearts
Gathering the right ingredients is key to making your Rice Krispie Valentine Hearts shine. Here’s a closer look at what you’ll need:
- Butter: Melted butter adds richness and helps bind the marshmallows and cereal together. You can use unsalted for better control over the sweetness.
- Marshmallows: Look for large marshmallows for the best texture. They bring that gooey sweetness we adore. Fresh marshmallows yield the best results, so check the date!
- Rice Krispies Cereal: This crispy cereal forms the base of your hearts, providing that delightful crunch. Feel free to substitute with any puffed rice cereal if you prefer.
- Valentine Sprinkles: These festive sprinkles are optional but add a fun pop of color and love! You can mix it up with themed sprinkles for other occasions, too.
You’ll find exact quantities at the bottom of the article, along with a handy printable version.
How to Make Rice Krispie Valentine Hearts
Making Rice Krispie Valentine Hearts is a delightful and fun process. Follow these simple steps to whip up a batch that will make your loved ones smile.
Step 1: Prepare Your Pan
Start by spraying a 9 x 13 pan with non-stick spray. This simple step ensures easy cleanup later. You could also line the pan with parchment paper for an added layer of convenience. Trust me; it makes lifting out the treats feel like magic!
Step 2: Melt the Butter
Next, melt your butter in a large microwave-safe bowl. Heat it in short bursts, checking on it after every 15 seconds to prevent splatters. Safety first! Hot butter can bubble over, so let it cool slightly before adding marshmallows.
Step 3: Combine Marshmallows
Once your butter is melted, add a whole bag of marshmallows into the mix. The marshmallows need to meld with the butter, creating that signature gooey goodness we all love. Stir them in until they’re well-coated. This is where the magic starts!
Step 4: Heat the Mixture
Now, it’s time to microwave the marshmallow mixture. Heat it for 45 seconds, then take it out and stir. Return it to the microwave for another 45 seconds. Remove it and stir until the mixture is perfectly fluffy and smooth. The marshmallows should double in volume, welcoming that airy texture!
Step 5: Mix in Rice Krispies
With your marshmallow fluff ready, pour in 6 cups of Rice Krispies Cereal. Gently fold the cereal into the mixture. This combination requires a light touch to achieve even distribution. The goal is to coat each piece of cereal without crushing them. Think of it as a gentle hug!
Step 6: Press in the Pan
Transfer the Rice Krispie mixture to your prepared pan. To ensure that your treats hold their shape, press the mixture firmly but evenly. A spatula works wonders here. Wetting your hands slightly can also help prevent sticking, making this step feel like child’s play.
Step 7: Add Sprinkles
Here’s where the fun begins! Once you’ve spread the mixture, sprinkle Valentine’s themed decorations all over the top. You can go wild with your creativity! Use heart shapes, sparkles, or even colored sugar for that festive flair. Your treats should look as delightful as they taste!
Step 8: Cut into Hearts
Finally, use a heart-shaped cookie cutter to press into the solidified mixture. Ideal for giving each treat a distinct heart shape. If the mixture sticks to the cutter, spray it lightly with non-stick spray for a smoother cut. Voila! You have beautiful Rice Krispie Valentine Hearts ready to be shared!
Tips for Success
- Use fresh marshmallows for the best texture and flavor; they make a noticeable difference.
- When pressing the mixture into the pan, dampen your hands or spatula to avoid stickiness.
- Customize with different sprinkles to match any occasion – it keeps things fun!
- Store leftovers in an airtight container to maintain that crispy goodness.
- For an extra touch, drizzle melted chocolate over the hearts before serving!
Equipment Needed
- 9 x 13 inch baking pan: This is where the magic happens! A glass or metal pan works great.
- Mixing bowl: Use a large microwave-safe bowl for combining everything. A sturdy plastic one is just fine!
- Spatula: Ideal for pressing the mixture into the pan. A silicone spatula is excellent for scraping!
- Heart-shaped cookie cutter: For the final touch! You can also use any shape for fun variations.
Variations of Rice Krispie Valentine Hearts
- Chocolate Drizzle: Melt some chocolate chips and drizzle them over the hearts for a rich, sweet enhancement. Your loved ones will adore the combination!
- Peanut Butter Twist: Stir in a few tablespoons of creamy peanut butter with the marshmallows. This adds a tasty layer of flavor that’s hard to resist!
- Dairy-Free Option: Substitute the butter with coconut oil and use vegan marshmallows to make these treats suitable for a dairy-free diet.
- Gluten-Free: Make sure your rice cereal is gluten-free. It’s an easy way to ensure those with dietary restrictions can enjoy these treats!
- Colorful Fun: Add a few drops of food coloring to your marshmallow mixture before mixing in the Rice Krispies. This gives a playful twist and loved by kids!
Serving Suggestions for Rice Krispie Valentine Hearts
- Pair these hearts with a glass of cold milk or hot chocolate for a nostalgic treat.
- Serve them on a decorative platter with fresh strawberries for a romantic touch.
- Wrap individual hearts in colorful cellophane for delightful party favors.
- Present them alongside a heartfelt handwritten note to make your gesture even more special.
FAQs about Rice Krispie Valentine Hearts
Can I make these Rice Krispie Valentine Hearts ahead of time?
Absolutely! These treats can be made a day or two in advance. Just store them in an airtight container to keep them fresh. That way, you can enjoy your time on Valentine’s Day without the last-minute rush!
What if I don’t have a heart-shaped cookie cutter?
No worries at all! You can use any cookie cutter shape you have on hand. Or simply cut them into squares or rectangles. They’ll still taste just as sweet, and you’ll impress everyone with your creativity!
Are Rice Krispie Valentine Hearts suitable for kids?
Definitely! This recipe is kid-friendly and perfect for little hands to help with. Just be mindful of any allergies, especially if you’re adding mix-ins like peanut butter. Kids will love joining you in this fun activity!
Can I replace Rice Krispies with another cereal?
For sure! You can substitute Rice Krispies with any other crispy cereal or even puffed grains. Just be sure they’re not too heavy, as you want that delightful, airy texture in every bite.
How long do these treats stay fresh?
If stored properly in an airtight container, your Rice Krispie Valentine Hearts should stay fresh for about a week. If you can resist eating them all at once, you might even get to savor the love a little longer!
Final Thoughts on Rice Krispie Valentine Hearts
Creating Rice Krispie Valentine Hearts is not just about making a treat; it’s about spreading a little joy and love. The smiles on your loved ones’ faces when they bite into these delightful goodies are truly priceless. Whether it’s a family gathering, a classroom celebration, or just a sweet surprise for your partner, this recipe brings people together. Plus, I love how it can spark creativity with toppings and decorations. So, roll up your sleeves, bring out your heart-shaped cookie cutter, and make some memories with these scrumptious hearts. You won’t regret it!
PrintRice Krispie Valentine Hearts
A fun and festive treat for Valentine’s Day, featuring crispy rice cereal and marshmallows shaped into hearts.
- Prep Time: 10 minutes
- Cook Time: 5 minutes
- Total Time: 15 minutes
- Yield: Approximately 12 servings 1x
- Category: Dessert
- Method: Microwave
- Cuisine: American
- Diet: Vegetarian
Ingredients
- 3 tbsp Butter, Melted
- 1 (10 oz) bag Marshmallows
- 6 cups Rice Krispies Cereal
- Valentine Sprinkles
Instructions
- Spray 9 x 13 pan with non-stick spray and set aside.
- Melt butter in a large microwave safe bowl.
- Pour marshmallows into the bowl and stir.
- Place into microwave for 45 seconds, remove and stir.
- Return to the microwave and heat for another 45 seconds. Remove from the microwave and stir again.
- Pour Rice Krispies into the melted marshmallows and mix until well combined.
- Distribute evenly and press firmly into the pan.
- Sprinkle with Valentine sprinkles.
- Press a heart shaped cookie cutter into the treats.
Notes
- For best results, use fresh marshmallows.
- Customize the sprinkles based on the occasion.
- Keep the treats stored in an airtight container for freshness.
Nutrition
- Serving Size: 1 heart
- Calories: 150
- Sugar: 10g
- Sodium: 40mg
- Fat: 5g
- Saturated Fat: 3g
- Unsaturated Fat: 2g
- Trans Fat: 0g
- Carbohydrates: 25g
- Fiber: 0g
- Protein: 1g
- Cholesterol: 15mg