
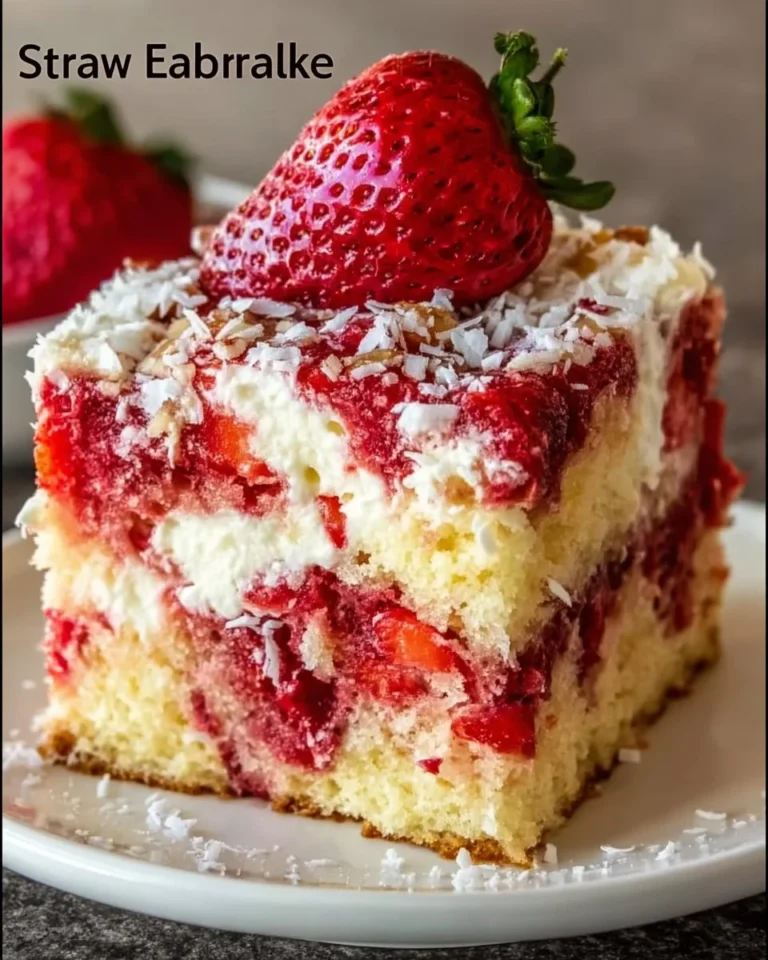
You know that moment when you bite into something so delicious that it feels like a party in your mouth? That’s exactly how I felt the first time I made Strawberry Earthquake Cake. This cake is a delightful mix of luscious strawberries, creamy swirls of cheesecake, and just the right amount of crunch from optional nuts and coconut. Honestly, you’ll see why this recipe quickly became a favorite in my kitchen!
One sunny Saturday afternoon, I decided to whip up something sweet. I wasn’t feeling fancy, just needed something simple that would make everyone smile. That’s when I stumbled upon this gem of a recipe. As I mixed the ingredients, the sweet aroma of strawberries filled the air. Trust me, it was hard to resist tasting the batter — the flavor was just incredible!
Why You’ll Love This Strawberry Earthquake Cake
Let’s talk about the reasons you’re gonna adore this Strawberry Earthquake Cake. First off, it’s ridiculously easy to make! You don’t have to be a baking expert. Plus, it’s a great way to use up fresh strawberries or even frozen ones. The swirls of cream cheese elevate it beyond your average cake, making it perfect for gatherings, family dinners, or honestly, just an afternoon treat.
Also, the texture is something special. The cake is soft, fluffy, and bursting with fruity goodness, whereas the cream cheese adds a lovely richness. And that crunchy topping? It gives it a unique twist that makes each bite exciting. This cake is perfect for quick meals, easy snacks, or special occasions.
Preparation Phase & Tools to Use
Before diving into the recipe, let’s gather what you need! You won’t need any fancy equipment here, just the basics.
Tools:
- 9×13 inch baking pan
- Mixing bowls (large and small)
- Electric mixer (or whisk if you’re feeling strong!)
- Spatula
- Measuring cups and spoons
Ingredients for Strawberry Earthquake Cake
Now, here’s what you’ll need:
- 1 box of strawberry cake mix
- 4 eggs
- 1/2 cup vegetable oil
- 1 cup water
- 1 cup crushed strawberries (fresh or frozen)
- 8 oz cream cheese, softened
- 1/2 cup powdered sugar
- 1/2 cup chopped nuts (optional)
- 1/2 cup shredded coconut (optional)
You might be thinking, “That’s it?” Yep! Nothing complicated here!
How to Make Strawberry Earthquake Cake at Home
Alright, let’s get into the fun part!
- Preheat the oven to 350°F (175°C). Grease your baking pan so the cake doesn’t stick later.
- In a large bowl, mix the strawberry cake mix, eggs, vegetable oil, and water until well combined. Don’t rush this step; it’s important to make sure there are no dry lumps!
- Gently fold in the crushed strawberries. I like to do this by hand with a spatula to keep the strawberries intact.
- Pour the batter into the prepared baking pan. Spread it evenly.
- In another bowl, beat the softened cream cheese and powdered sugar until smooth. You want it creamy but not too runny.
- Drop spoonfuls of the cream cheese mixture over the cake batter. Then, use a knife to swirl it slightly. Be careful not to overdo it—you want those stripes to show!
- Sprinkle the chopped nuts and shredded coconut on top if you’re using them. It adds a nice crunch!
- Bake for 30-35 minutes or until a toothpick inserted comes out clean. Keep an eye on it because every oven is a bit different; you might need an extra minute.
- Let it cool in the pan for a bit before serving. This will help the flavors meld together nicely!
Pro Tips for Best Results
- Quick tip: Don’t skip the washing and drying of your strawberries if you’re using fresh ones! It’s a game changer.
- I noticed that the cake is lighter and fluffier if you mix the batter slowly. Don’t rush this part!
- If you want a more intense strawberry flavor, add a few extra crushed strawberries into the batter.
Variations & Customization Ideas
There’s so much room for creativity with this cake!
- Different Cake Mixes: You can use a vanilla or chocolate cake mix instead of strawberry.
- Fruits: Try adding blueberries or raspberries along with the strawberries for a berry explosion!
- Toppings: Get adventurous! Top with whipped cream, or even drizzle some chocolate sauce over it.
Common Mistakes to Avoid
- The number one mistake I see is mixing too aggressively. You want to keep it light and airy.
- Don’t forget to grease your pan well! I’ve had cakes stick before, and it’s such a disaster.
- Always check doneness with a toothpick. Better to pull it out a bit early than to overbake it.
What to Serve With Strawberry Earthquake Cake
This cake is a star on its own, but you can jazz it up by serving it with a scoop of vanilla ice cream or dollops of whipped cream. You could even pair it with a lovely cup of coffee or herbal tea to balance the sweetness.
Storage & Reheating Instructions
If you somehow have leftovers (which is rare!), store them in an airtight container in the fridge for up to 4 days. You can reheat slices in the microwave for 10-15 seconds. Just don’t overdo it; you want that cream cheese to stay soft and gooey.
Estimated Nutrition Information
- Calories: Approximately 245 per slice
- Carbs: 29g
- Protein: 3g
- Fat: 12g
(Making sure to account for nuts or coconut changes this slightly.)
FAQs
1. Can I use frozen strawberries?
Absolutely! Just let them thaw and drain a bit before using.
2. How do I make it gluten-free?
Use a gluten-free cake mix, and you’re good to go.
3. What if my cake sinks?
This could happen if the batter is overmixed or if it’s undercooked. Keep an eye on cooking times!
4. Can I freeze this cake?
Yes! It freezes well. Just make sure to wrap it tightly in plastic wrap before placing it in a freezer bag.
5. What toppings do you recommend?
Whipped cream, fresh strawberries, or a drizzle of chocolate are all fantastic options.
Expert Tips for the Best Strawberry Earthquake Cake
Here’s the thing: if you want the cream cheese swirl to look amazing, chill your cream cheese first. Also, if you’re feeling artsy, you can make decorative swirls on top just before baking. Don’t worry about perfection; it’s homemade!
Conclusion
Believe me when I say, this Strawberry Earthquake Cake is a delightful treat that will win over anyone who takes a bite. It’s fruity, creamy, and simply addictive. So, gather your ingredients and make it this weekend. You won’t regret it!
Save this recipe for later! Trust me, you’ll want to whip it out for your next gathering or just for a cozy night at home.
PrintStrawberry Earthquake Cake
A delightful mix of luscious strawberries, creamy swirls of cheesecake, and a crunchy topping, perfect for gatherings or a simple afternoon treat.
- Prep Time: 15 minutes
- Cook Time: 35 minutes
- Total Time: 50 minutes
- Yield: 12 servings 1x
- Category: Dessert
- Method: Baking
- Cuisine: American
- Diet: Vegetarian
Ingredients
- 1 box of strawberry cake mix
- 4 eggs
- 1/2 cup vegetable oil
- 1 cup water
- 1 cup crushed strawberries (fresh or frozen)
- 8 oz cream cheese, softened
- 1/2 cup powdered sugar
- 1/2 cup chopped nuts (optional)
- 1/2 cup shredded coconut (optional)
Instructions
- Preheat the oven to 350°F (175°C). Grease your baking pan.
- Mix the strawberry cake mix, eggs, vegetable oil, and water until well combined.
- Fold in the crushed strawberries gently.
- Pour the batter into the prepared baking pan.
- Beat the softened cream cheese and powdered sugar until smooth.
- Drop spoonfuls of the cream cheese mixture over the cake batter and swirl gently with a knife.
- Sprinkle chopped nuts and shredded coconut on top if using.
- Bake for 30-35 minutes or until a toothpick inserted comes out clean.
- Let it cool before serving.
Notes
For best results, be careful not to overmix the batter.
Nutrition
- Serving Size: 1 slice
- Calories: 245
- Sugar: 15g
- Sodium: 350mg
- Fat: 12g
- Saturated Fat: 4g
- Unsaturated Fat: 6g
- Trans Fat: 0g
- Carbohydrates: 29g
- Fiber: 1g
- Protein: 3g
- Cholesterol: 30mg