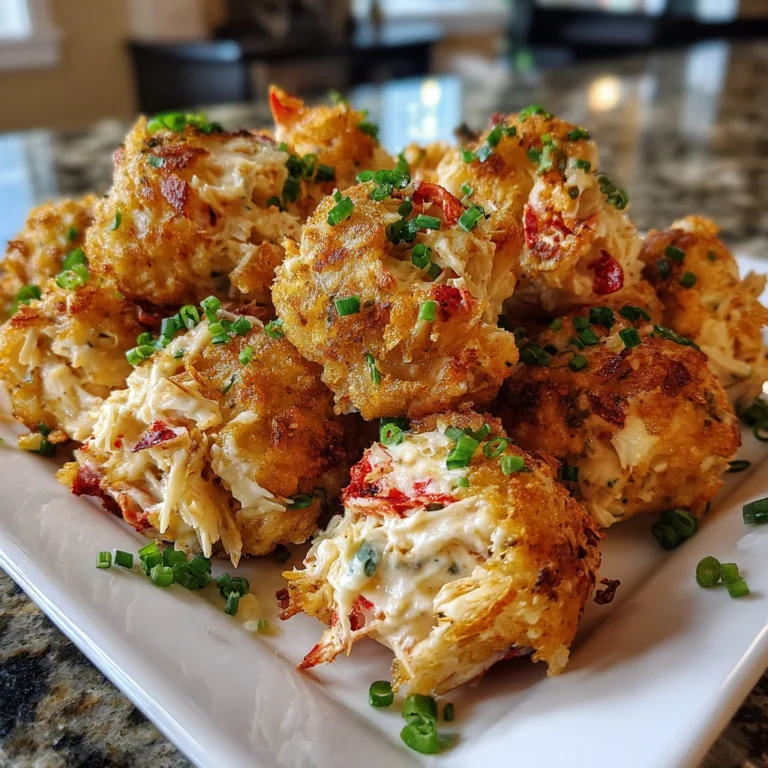
Introduction to Crab Crunchies
Ah, the beauty of bite-sized treats!
Crab Crunchies are my go-to for quick solutions, especially on those hectic days when time slips through my fingers like sand.
Picture this: you’ve had a long day of juggling chores and kids, and you crave something both satisfying and simple.
These golden delights are not just a feast for the eyes but a delicious escape for your taste buds!
They’re perfect for impressing loved ones or just treating yourself after a bustling day.
Let’s dive into making these crispy wonders that bring joy and comfort to your home.
Why You’ll Love This Crab Crunchies
If you’re seeking a flavor-packed appetizer that won’t steal hours from your day, Crab Crunchies are your answer!
They come together in just 25 minutes, making them a lifesaver for any busy mom or professional.
With a crispy exterior and a creamy, savory filling, these bites are sure to wow everyone at your table.
Plus, you can easily customize them to fit your family’s tastes.
What’s not to love?
Ingredients for Crab Crunchies
Making Crab Crunchies is simple and fun! Here’s what you’ll need to whip up these tasty bites.
- Crab Meat: Whether it’s fresh, canned, or imitation, this is the star of the dish. The quality of crab meat can greatly enhance the flavor.
- Cream Cheese: This creamy goodness gives your Crab Crunchies that delightful richness. Softened is key for easy mixing!
- Mayonnaise: A dollop of mayo adds creaminess and a hint of tang. Low-fat versions work if you’re watching calories.
- Dijon Mustard: This brings a bit of kick! If you prefer less tang, yellow mustard can be a fine substitute.
- Lemon Juice: A splash of lemon juice brightens the flavors and balances the richness. Fresh is best, but bottled can do in a pinch.
- Green Onions: Chopped finely, they add a mild onion flavor and a pop of color. You could replace them with chives if needed.
- Garlic Powder: This adds a hint of savory goodness. If you’re feeling adventurous, fresh minced garlic would work too!
- Salt and Pepper: Essential for seasoning! Adjust to taste, as everyone likes their bites seasoned differently.
- Breadcrumbs: For a lovely crispy crust. I prefer panko for extra crunch, but regular breadcrumbs are great too.
- Egg: The beaten egg helps the breadcrumbs adhere and gives your crab balls that golden finish. Vegan options like flaxseed meal can replace it.
Exact quantities for each ingredient are at the bottom of the article, where you can find them for easy printing too!

How to Make Crab Crunchies
Let’s get our hands a little messy and dive into making these delectable Crab Crunchies!
Follow these simple steps, and you’ll be enjoying these tasty bites in no time.
Ready? Let’s go!
Step 1: Prepare the Crab Mixture
Start by grabbing a large mixing bowl.
Toss in the crab meat, softened cream cheese, mayonnaise, Dijon mustard, and lemon juice.
Then, sprinkle the minced green onions and garlic powder over the top.
Season with salt and pepper to taste!
Now, stir everything together until the mixture is smooth and well-combined.
It should look creamy and inviting—absolutely delicious!
Step 2: Shape Your Crab Crunchies
This is where the fun begins!
Using your hands, shape the crab filling into small balls or patties, whichever you prefer.
Aim for bite-sized pieces; they should fit perfectly in your mouth for that delightful crunch.
If you’re feeling fancy, you could even try different shapes like mini crab cakes!
Step 3: Coat with Breadcrumbs
Grab a shallow bowl and pour in your breadcrumbs.
Dip each crab ball or patty into beaten egg before rolling it in the breadcrumbs.
Ensure they’re covered evenly so that every bite is crunchy and satisfying.
If you prefer a more textured crunch, panko breadcrumbs work wonders!
Step 4: Fry to Perfection
Heat up the skillet over medium heat—don’t rush this part!
Add a splash of oil to get things sizzling.
Once the oil is hot, carefully place the crab balls or patties into the skillet.
Cook them for about 3-4 minutes per side until they turn golden brown.
The aroma wafting through your kitchen will have everyone asking what’s cooking!
Step 5: Drain and Serve
Once golden and crispy, remove your Crab Crunchies from the skillet.
Let them rest on a paper towel-lined plate to drain excess oil.
Serve them warm with your favorite dipping sauces, like cocktail sauce or tartar sauce.
Trust me, these little bites will disappear faster than you can say “Crab Crunchies”!
Tips for Success
- Always use fresh crab meat for the best flavor. If you can, visit a local seafood market.
- Soften your cream cheese at room temperature for easier mixing.
- If you’re short on time, shape the crab mixture ahead and store in the fridge until you’re ready to fry.
- Don’t overcrowd the skillet while frying; this ensures an even, crispy texture.
- Experiment with different dipping sauces to find your family’s favorite.
Equipment Needed
- Mixing Bowl: A large bowl for combining ingredients. Even a pot can work in a pinch!
- Skillet: A non-stick skillet is best for frying. You can use any frying pan if necessary.
- Spoon or Spatula: For mixing and frying. A spatula helps with flipping!
- Shallow Bowl: To hold breadcrumbs for easy coating. A plate works too!
- Paper Towels: For draining excess oil after frying. Alternatively, you can use a wire rack!
Variations
- Spicy Cajun: Add a teaspoon of Cajun seasoning or a pinch of cayenne pepper to the crab mixture for a zesty twist.
- Herby Delight: Mix in fresh herbs like dill or parsley for a refreshing flavor that’s perfect for summer gatherings.
- Vegetarian Option: Swap crab meat with finely chopped mushrooms or artichoke hearts for a tasty meatless version.
- Cheesy Crab Crunchies: Incorporate shredded cheese like cheddar or Monterey Jack into the mixture for an extra cheesy bite.
- Gluten-Free: Use gluten-free breadcrumbs and ensure all sauces and ingredients are certified gluten-free for a safe option.
Serving Suggestions
- Pair your Crab Crunchies with a crisp garden salad for a refreshing contrast.
- Serve with homemade tartar sauce or zesty cocktail sauce to enhance flavors.
- A chilled glass of white wine, like Sauvignon Blanc, complements the dish beautifully.
- Arrange on a colorful platter with lemon wedges for an eye-catching presentation.
- Add some fresh herbs as garnish for that perfect finishing touch!
FAQs about Crab Crunchies
I know you might have some questions about these delicious Crab Crunchies!
Here are a few common queries answered to help you get started.
Let’s dive in!
Can I use frozen crab meat for this recipe?
Absolutely! Frozen crab meat works well in Crab Crunchies.
Just be sure to thaw it completely and drain any excess liquid before mixing.
What dipping sauce goes well with Crab Crunchies?
The classic choice is cocktail sauce, but tartar sauce is a fantastic option too!
Feel free to experiment with spicy mayonnaise or a sweet chili sauce for added flair!
Can I bake instead of fry the Crab Crunchies?
Yes, you can!
Baking them at 375°F (190°C) for about 15-20 minutes is a lighter option.
Just keep an eye on them until they turn golden and crispy!
How long can I store leftovers?
Leftover Crab Crunchies can be stored in an airtight container for up to 2 days.
Reheat them in the oven or skillet to maintain that satisfying crunch!
What if I don’t have breadcrumbs?
If you’re out of breadcrumbs, crushed crackers or even panko-style chips can work as a substitute!
They’ll still give you that enjoyable crunch in every bite.
Final Thoughts
Crab Crunchies are more than just an appetizer; they’re a celebration of flavor and comfort.
Whether you’re hosting friends or treating your family on a busy weeknight, these crispy bites bring joy to any table.
I love how they bridge the gap between casual and fancy with effortless charm!
With simple ingredients and a bit of love, you can create something truly special.
So roll up your sleeves and embark on this culinary adventure.
Trust me, each crunchy bite will leave everyone craving more, including yourself!
Crab Crunchies
Crab Crunchies are bite-sized delights made with crab meat and a creamy filling, coated in breadcrumbs and fried to perfection!
- Prep Time: 15 minutes
- Cook Time: 10 minutes
- Total Time: 25 minutes
- Yield: 4 servings 1x
- Category: Appetizer
- Method: Frying (or Baking)
- Cuisine: American
- Diet: Low Calorie
Ingredients
- 1 lb crab meat (fresh, canned, or imitation)
- 8 oz cream cheese (softened)
- 2 tablespoons mayonnaise
- 1 tablespoon Dijon mustard
- 1 tablespoon lemon juice
- 2 green onions (finely chopped)
- 1/2 teaspoon garlic powder
- Salt and pepper (to taste)
- 1 cup breadcrumbs (for coating)
- 1 egg (beaten)
Instructions
- In a large mixing bowl, combine the crab meat, cream cheese, mayonnaise, Dijon mustard, lemon juice, green onions, garlic powder, salt, and pepper. Stir until all the ingredients are well combined and the mixture is smooth.
- Using your hands, shape the crab mixture into small bite-sized balls or patties, depending on your preference.
- Place the breadcrumbs in a shallow bowl. Dip each crab ball or patty into the beaten egg, then roll it in the breadcrumbs to coat evenly.
- Heat a large skillet over medium heat and add a little oil for frying.
- Carefully place the coated crab balls or patties in the hot skillet and cook for about 3-4 minutes per side, or until golden brown and crispy.
- Once cooked, remove from the skillet and place on a paper towel-lined plate to drain excess oil.
- Serve the Crab Crunchies warm with your favorite dipping sauce, such as cocktail sauce or tartar sauce.
Notes
- You can bake the Crab Crunchies instead of frying if you prefer a lighter option. Simply place them on a baking sheet and bake at 375°F (190°C) for about 15-20 minutes, or until golden brown.
- If you’d like a bit of heat, add a pinch of cayenne pepper or red pepper flakes to the crab mixture.
- These are best served fresh, but you can store leftovers in an airtight container in the fridge for up to 2 days. Reheat in the oven or skillet for a crispy finish.
Nutrition
- Serving Size: 4 pieces
- Calories: 250
- Sugar: 1g
- Sodium: 400mg
- Fat: 15g
- Saturated Fat: 5g
- Unsaturated Fat: 8g
- Trans Fat: 0g
- Carbohydrates: 20g
- Fiber: 1g
- Protein: 10g
- Cholesterol: 60mg